 |
| Just a shame I didn't get to play them |

My list, as a refresher, was:
- Flyrant: 2xTL Devourers, Hive Commander
- 3 Zoanthropes: Mycetic Spore
- Tervigon: Catalyst
- 15 Termagants: Devourers
- Mawloc
Anthony, as is his MO, brought as many powerful bugs as he could:
- Swarmlord: 2 Tyrant Guard
- Flyrant: TL Devourers
- Doom of Malan'Tai: Mycetic Spore
- Tervigon: 3 Powers
- ~10 Termagants
The mission was Emperor's Will on Hammer and Anvil deployment (not a big difference on a 4x4 board), or as Anthony put it, Emperor's First Blood.
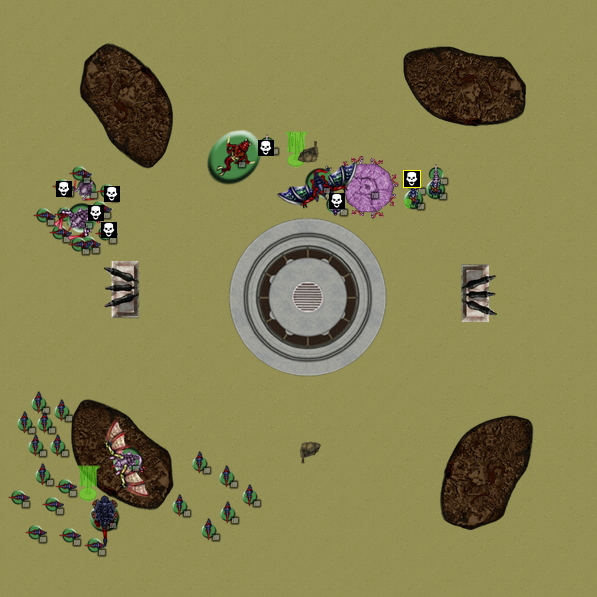
Deployment:


Anthony won the roll off and, remembering what happened last time we faced off, chose to make me go first. I had a good bit of LOS blockers, so I put the Mawloc behind one, the Tervigon behind another on the objective, and the Flyrant in the middle behind a statue, just in case he decided to try to seize. The Termagants would be outflanking courtesy of Hive Commander, while the Zoans would obviously be deep striking.
Anthony deployed centrally, with his termagants on the objective and the Swarmlord dead center and up front. The Flyrant was off to the side and the tervigon behind.
Turn 1:


I chose to burrow the Mawloc, move the flyrant toward the corner and then "run" move back behind the LOS blocking terrain in Anthony's corner. I initially rolled a 2 for my run, but fortunately had cast Warp Speed on him so got to reroll. The Tervigon cast Catalyst on herself and spawned 7 gaunts, not running out. They looped around front to provide a buffer in front of the objective.

Anthony flew his flyrant up my right flank. The tervigon spawned out on a decent number, and the moved up to my left. The other gants shuffled around while the Swarmlord walked up a bit.
Turn 2:


Everything came in this turn. The mawloc scattered only 2" and took out a few gaunts, landing smack dab on Anthony's objective. The pod with the Zoans hit to the side of the Swarmlord with the Zoans getting out within 12" of the Tervigon, preparing to Psychic Shriek. I opted not to cast Warp Speed with the Flyrant and skimmed around the back of the rock, keeping out of sight of the Swarmlord's group. The Devilgants entered the board on my left. The tervigon spawned 6 gants, again not running out, and Enduranced herself.
In the shooting phase, I shot the Flyrant at the Tervigon, which was probably premature, but did a couple wounds. I then cast Psychic Shriek on the Tervigon with all three Zoanthropes. Each one passed their Shadows in the Warp check, he failed to deny any of them, and I promptly rolled a 17 on the first check, killing the Tervigon, who took all but one or two termagants from each squad with her. The devilgants wounded a Tyrant guard.

In his turn, his flyrant jumped up right above my Tervigon. The Swarmlord moved to be in between the termagants and the Flyrant in case he was lucky and grounded him somehow. The doom dropped in between the Zoans and Mawloc, and two surviving gants made for the Zoans. Shooting and psychic powers directed primarily at the Mawloc removed some wounds, but didn't kill him. One Zoanthrope died to the Doom's attack, along with the spore. In the assault phase, the two termagants charged the Zoans and dealt a wound. Meanwhile the Swarmlord and guards charged the devilgants, losing the wounded guard, but making a 9" charge. They slaughtered several, but because of Swarmlord's synapse, the termagants didn't run.
Turn 3:

The flyrant dropped to the ground just outside 6" of the Doom and the Mawloc shimmied to the side, outside of the 6" bubble of doom. The Tervigon spawned another 6 man blob of gants and continued to expand the footprint of bubble wrap surrounding the objective. The gants and tervigon took some pot shots and actually grounded the flyrant, but only caused the one wound from grounding. The flyrant dealt two wounds to the Doom with shooting before assaulting in and smashing him down, instant killing him with strength 10. Meanwhile the Mawloc charged the lone termagant and killed him. Both the Mawloc and Flyrant consilidated back toward Anthony's objective. The swarmlord meanwhile killed a few more termagants, leaving four left and the Zoanthropes killed one of the two gants assaulting them.

In Anthony's turn, he flew his flyrant back toward his side and shot at the Mawloc, finally taking it down. Time was called as the Swarmlord slaughtered the final termagants, consolidating toward my objective, but still far away.
Final Thoughts:
Anthony was a little frustrated at not getting another turn in, though I pointed out it wouldn't have changed the result - he had a single termagant left, who I would have assaulted with the flyrant and killed easily, so he had no way to capture objectives. Meanwhile I would have spawned another termagant squad, possibly bigger, and thrown one of the small squads right at the swarmlord, preventing him from closing with the objective. Even with 7 turns he wouldn't get there since I had at least 4 sacrificial units to put in his way while my Flyrant would have then been freed up to hunt down his wounded flyrant.
While Anthony's list featured several scary threats, the fact was that once I killed the Tervigon, the game was over as I had just about wiped out his scoring. My one mistake was firing the Hive Tyrant first - I should have let the Zoans do their thing, then torch the remaining gants from one squad with the hive tyrant. That said, with me getting lucky and keeping the Mawloc alive, I was able to mitigate the lone surviving termagants. He made a good move assaulting the Zoans to keep them in Doom range, but in the end it didn't help him as I continued a lucky hot streak. But they'd done their job at that point, so even if they'd been soul-sucked by Doom, I would have been fine. Anthony also played into my hands a bit charging my devourer termagants, who were a big enough group to hold him in place for a while. I had no real intention of killing the Swarmlord, and I didn't have to, with nearly half his army in that walking unit, I could pretty easily just avoid it.
Stay tuned for Game 2 versus Space Wolves.
Stay tuned for Game 2 versus Space Wolves.
No comments:
Post a Comment