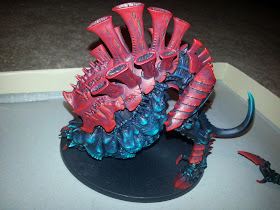
One of the first things I noticed when I came back to the hobby was that there were now some very big models. The last time I had looked at the model ranges for 40k, the biggest things around after Monoliths were Greater Daemons and maybe the 3rd edition Carnifex. For the 'nids, I was instantly enamored by the Trygon kit - let's be honest, that kit is just plain cool. I was less enthused by the other big kit, the Tervigon/Tyrannofex, but I was assured repeatedly that in order to update my army, I needed one or more.
While I hadn't been a fan of the kit when I bought it, and honestly was astounded by the complexity of putting it together (this may very well have been the first GW kit I needed to reference the instructions for), I actually came to really like the model as I painted it. I think it says something for the quality and detail of the kits that it isn't until you start seeing and feeling how paint is going on the model that you come to notice some details
In assembling the model, I knew I wanted to magnetize the arms to have options for both scything talons and crushing claws. I also left the head off since I realized it would be very difficult to paint attached. Honestly, this was the first model I had ever painted without it being largely unassembled, and I learned how much easier it is.
Befitting my dark scheme, I gave all the pieces a coat of black primer and then went to work.
I opted to paint the model in sections rather than coats, and focused on the carapace first, starting with Scab Red. On the first coat, I learned my second lesson from this massive model - just how huge it is - when it took well over an hour for a single coat. From the Scab Red basecoat, I did a 50/50 mix of Scab Red/Red Gore, then Red Gore, Red Gore/Blood Red, and finally ending with Blood Red.
With the carapace completed, I moved on to the body and belly sections. Expanding on my gradual inclusion of dark green to highlight the black, I started by touching up the black where it was either thin or where I got some red outside the lines. From there I made highlights of Incubi Darkness and then blended Incubi Darkness and Jade Green, slowly increasing the ratio until very small pure Jade Green highlights. For the belly, I decided the stretched skin should be even brighter, and added white to the Jade Green to add another 2-3 highlights.
From there all I needed to do was paint the fleshy bits and teeth, eyes, and tongue. In the past, my fleshy bits had simply been Putrid Green (a very old GW paint reminiscent of Cartoon Nuclear Waste). For the large fleshy sections of this model, I felt a need to add more detail. Also, as I saw the goo/fluids from the birthing area to be of the same color, I decided to add progressive highlights of more and more white blended into the putrid green until it was nearly pure white on the highest level:
Finally, the teeth were simply three layers of brown to bleached bone, giving me my final product, aside from the base. I wanted to do something a little extra besides simply sand drybrushed and static grass. I eventually settled on making some carboard tiles, which I painted with a marble effect I managed by swirling together watered down tan and brown.
And with that, I was done. It took about a week all in all, but I am definitely happy with the results:


No comments:
Post a Comment